
A friend of mine did a modification of his SOCOM's stock and I thought that it might interest some of you.
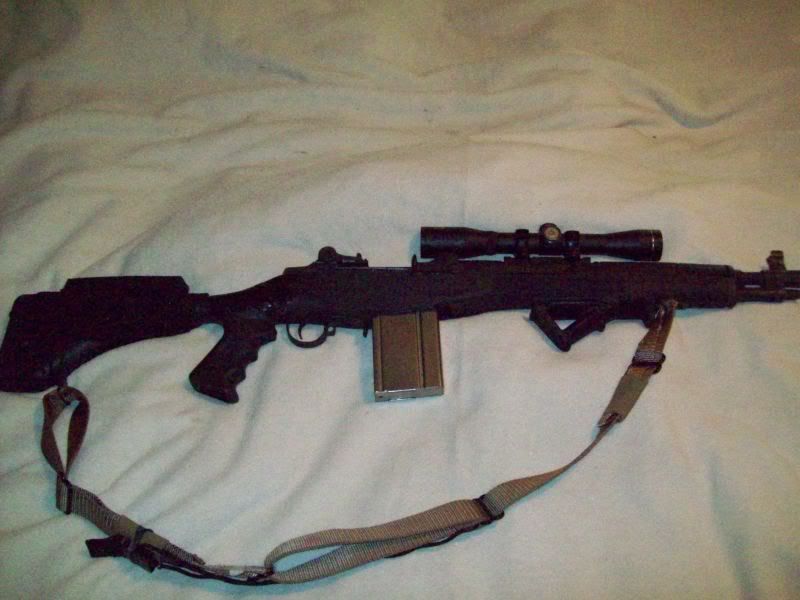
His objective was to add an adjustable butt piece and a hand grip. He used an old fiberglass stock as the base and an ATI pistol grip stock. I've shot the rifle and it really is well made. There is no unusual movement or feel, it's quick to point and lightweight.
Here is his how-to description with pictures.
Here's some pics of that stock build. It was pretty easy, and has proven to be durable - and inexpensive to build.
![Image]()
This is just checking the angle of the "interface" - I spent a decent amount of time looking for a stock that I thought would work, and the ATI shotgun stock seemed perfect:
![Image]()
If I was to do this again, I'd make the cut about 1/4"-3/8" further down the grip toward the buttstock to give a little more range to the grip....
![Image]()
Another reason to make the cut further down is that there is a steel pin running through the neck - and I happened to cut it in half - which made my blade unhappy.
![Image]()
You can see the pin, and the filler of urethane foam that makes up the core of the stock....
![Image]()
Using an electric handpiece (dremel-like tool) I ground out the cavity and cleaned up the edges. You want to create a negative draft on the sides so that the filler is mechanically as well as chemically anchored, and also knock down any sharp edges to eliminate the possibility of creating stress risers.
![Image]()
The ATI stock snugged right up...
![Image]()
This is a test fit of the pistol grip - the area above the grip had to be knocked back a little to allow the trigger guard to swing open - but just a bit - and cutting further back would have fixed this....
![Image]()
I drilled a hole through the bulkhead of the back plane of the stock to hold a bolt that would hold the stock tight while the Magic-Sculpt cured.
![Image]()
Naphtha mixed with Vaseline makes a great parting compound - this was painted liberally all over the cavity inside the mating surface of the ATI stock AND THE BOLT to keep the Magic-Sculpt resin from sticking during the cure
![Image]()
Magic Scuplt is a two-part epoxy clay resin. It cures extremely hard and tough. I mixed in some chopped fiberglass to add to it's strength, but I don't know if that's necessary (it is very durable material). You could use a mixture of chopped glass and fiberglass resin as well, it would just be a little messier to deal with - I used what I had.
![Image]()
![Image]()
The cavity inside the stock and the cavity inside the new buttstock was filled with the epoxy sculpt mixture, and a bolt with a nut was tightened to hold it all together for the cure. Excess material is removed while in the clay-like state - since later it would be a LOT harder to get off.
![Image]()
Actually, I didn't have the right nut for the bolt - so I used a wood insert here - but it's just to hold it all together during the cure....
![Image]()
Once cured, you can see the fidelity of the impression - the Epoxy Sculpt made a perfect "key" to the buttstock's mating face - including serial number")
![Image]()
I filled the selector notch....
![Image]()
I fabricated a slightly wedge-shaped aluminum plate to sit against the bulkhead at the back of the stock - to reinforce the mounting point.
![Image]()
Plate mounted and drilled...
At this point it was a matter of sanding, filling, painting. The original paint was a lot more flat - and it was a bit too "dusty" so I painted it again (Duracoat). I'd like to have a bit more flat paint on it, but that'll have to wait - and at least it's really easy to give it a paintjob...
![Image]()
![Image]()
![Image]()
Lightweight, collapsible, convertible, comfortable - what's not to like?
His objective was to add an adjustable butt piece and a hand grip. He used an old fiberglass stock as the base and an ATI pistol grip stock. I've shot the rifle and it really is well made. There is no unusual movement or feel, it's quick to point and lightweight.
Here is his how-to description with pictures.
Here's some pics of that stock build. It was pretty easy, and has proven to be durable - and inexpensive to build.

This is just checking the angle of the "interface" - I spent a decent amount of time looking for a stock that I thought would work, and the ATI shotgun stock seemed perfect:

If I was to do this again, I'd make the cut about 1/4"-3/8" further down the grip toward the buttstock to give a little more range to the grip....

Another reason to make the cut further down is that there is a steel pin running through the neck - and I happened to cut it in half - which made my blade unhappy.

You can see the pin, and the filler of urethane foam that makes up the core of the stock....

Using an electric handpiece (dremel-like tool) I ground out the cavity and cleaned up the edges. You want to create a negative draft on the sides so that the filler is mechanically as well as chemically anchored, and also knock down any sharp edges to eliminate the possibility of creating stress risers.

The ATI stock snugged right up...

This is a test fit of the pistol grip - the area above the grip had to be knocked back a little to allow the trigger guard to swing open - but just a bit - and cutting further back would have fixed this....

I drilled a hole through the bulkhead of the back plane of the stock to hold a bolt that would hold the stock tight while the Magic-Sculpt cured.

Naphtha mixed with Vaseline makes a great parting compound - this was painted liberally all over the cavity inside the mating surface of the ATI stock AND THE BOLT to keep the Magic-Sculpt resin from sticking during the cure

Magic Scuplt is a two-part epoxy clay resin. It cures extremely hard and tough. I mixed in some chopped fiberglass to add to it's strength, but I don't know if that's necessary (it is very durable material). You could use a mixture of chopped glass and fiberglass resin as well, it would just be a little messier to deal with - I used what I had.


The cavity inside the stock and the cavity inside the new buttstock was filled with the epoxy sculpt mixture, and a bolt with a nut was tightened to hold it all together for the cure. Excess material is removed while in the clay-like state - since later it would be a LOT harder to get off.

Actually, I didn't have the right nut for the bolt - so I used a wood insert here - but it's just to hold it all together during the cure....

Once cured, you can see the fidelity of the impression - the Epoxy Sculpt made a perfect "key" to the buttstock's mating face - including serial number

I filled the selector notch....

I fabricated a slightly wedge-shaped aluminum plate to sit against the bulkhead at the back of the stock - to reinforce the mounting point.

Plate mounted and drilled...
At this point it was a matter of sanding, filling, painting. The original paint was a lot more flat - and it was a bit too "dusty" so I painted it again (Duracoat). I'd like to have a bit more flat paint on it, but that'll have to wait - and at least it's really easy to give it a paintjob...


Lightweight, collapsible, convertible, comfortable - what's not to like?